Deploy Airbyte to Kubernetes
Step-by-step guide to install Airbyte Helm v1 chart on ARM64 GKE with Cloud SQL and GCS. Includes production-ready values.yaml configuration and troubleshooting tips.

Step-by-step production deployment of Airbyte 1.8.1 on GKE ARM64 infrastructure with Cloud SQL and Google Cloud Storage
TL;DR
Installing Airbyte Helm v1 chart on ARM64 Kubernetes requires specific configurations for production readiness. Key points:
- Use Airbyte Helm Chart v1.8.1 for stable ARM64 support
- ARM64 tolerations required for all services to run on cost-effective ARM nodes
- External Cloud SQL PostgreSQL recommended over in-cluster database
- Google Cloud Storage integration for scalable state and log storage
- High availability setup with 3 replicas for critical services
- Resource limits tuned for ARM64 performance characteristics
- Multi-tenant ready with proper authentication and security
Installation time: 15-30 minutes with pre-configured infrastructure. Cost savings: 20-40% compared to x86 equivalent setup.
Introduction
Airbyte on Kubernetes using Helm charts provides enterprise-grade data integration capabilities, but deploying it correctly on ARM64 infrastructure requires understanding the specific configuration nuances. This guide walks through a complete production installation of Airbyte Helm v1 chart on Google Kubernetes Engine (GKE) with ARM64 nodes, external Cloud SQL database, and Google Cloud Storage.
Unlike generic installation guides, this tutorial uses real-world production values and explains the rationale behind each configuration choice. If you need expert assistance with Docker and Kubernetes deployments, EaseCloud specializes in production-ready data platform implementations.
Infrastructure Overview
Our Production Setup
Before diving into the Helm installation, let's understand the infrastructure architecture we're deploying to:
Google Kubernetes Engine (GKE) Cluster:
- Node Pool: ARM64 nodes (t2a-standard-16, Tau T2A processors)
- Node Count: 4 nodes for high availability
- Zones: Multi-zone deployment across us-central1
- Networking: VPC-native with private nodes
External Dependencies:
- Database: Cloud SQL PostgreSQL 15 (db-perf-optimized-N-4)
- Storage: Google Cloud Storage buckets for logs, state, and workload output
- DNS: Cloud DNS for custom domain (etl.yourdomain.com)
- SSL: Let's Encrypt certificates via cert-manager
Security & Access:
- Authentication: Instance admin with secure password management
- Secrets: Google Secret Manager integration
- Network: Private cluster with authorized networks
Why This Architecture?
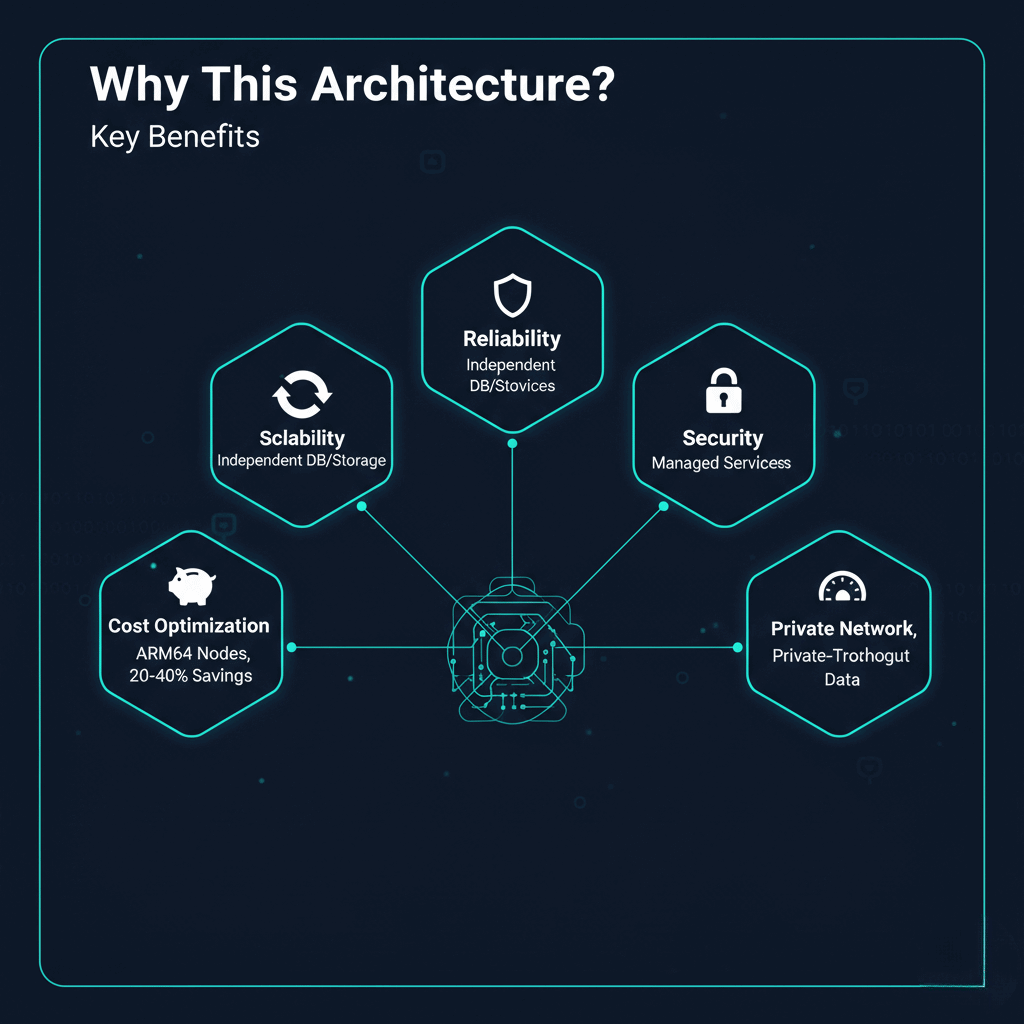
This setup provides:
- Cost Optimization: ARM64 nodes offer 20-40% cost savings
- Scalability: External database and storage scale independently
- Reliability: Multi-zone deployment with external managed services
- Security: Private networking with managed SSL certificates
- Performance: Optimized for high-throughput data pipelines
Prerequisites
Infrastructure Setup
- GKE Cluster with ARM64 nodes:
gcloud container clusters create airbyte-cluster \
  --zone us-central1-a \
  --machine-type t2a-standard-16 \
  --num-nodes 4 \
  --enable-ip-alias \
  --enable-network-policy \
  --enable-autoscaling \
  --min-nodes 2 \
  --max-nodes 8
- Cloud SQL PostgreSQL instance:
gcloud sql instances create airbyte-postgres \
  --database-version POSTGRES_15 \
  --tier db-perf-optimized-N-4 \
  --region us-central1 \
  --storage-type SSD \
  --storage-size 100GB \
  --storage-auto-increase
- Google Cloud Storage buckets:
gsutil mb -l us-central1 gs://airbyte-storage-xxxx
- Required Tools:
# Install Helm
curl https://get.helm.sh/helm-v3.14.0-linux-arm64.tar.gz | tar -xzO linux-arm64/helm > /usr/local/bin/helm
chmod +x /usr/local/bin/helm

# Install kubectl (if not already installed)
gcloud components install kubectl
Helm Repository Setup
Add Airbyte Helm Repository
# Add the official Airbyte Helm repository
helm repo add airbyte https://airbytehq.github.io/helm-charts

# Update repositories to get latest charts
helm repo update

# Verify Airbyte v1 chart availability
helm search repo airbyte/airbyte --versions | grep "^airbyte/airbyte\s*1\."
Expected output:
airbyte/airbyte    1.8.1    1.8.1    Helm chart to deploy Airbyte in the cloud
airbyte/airbyte    1.8.0    1.8.0    Helm chart to deploy Airbyte in the cloud
Production Values Configuration
Understanding the values-v1.yaml Structure
Our production values-v1.yaml file is organized into several key sections. Let's break down each component:
Global Configuration
global:
  serviceAccountName: "airbyte-admin"
  edition: "community"
  airbyteUrl: "https://etl.yourdomain.com"
Key Points:
serviceAccountName: Dedicated service account for RBACedition: Community edition (free) vs EnterpriseairbyteUrl: Your custom domain for accessing Airbyte UI
Authentication Setup
global:
  auth:
    enabled: true
    instanceAdmin:
      secretName: "airbyte-auth-secrets"
      firstName: "Admin F"
      lastName: "Admin L"
      email: "admin@airbyte.example"
      passwordSecretKey: "instance-admin-password"
Why This Matters:
- Enables secure authentication instead of open access
- Uses Kubernetes secrets for password management
- Configures initial admin user
External Database Configuration
global:
  database:
    type: "external"
    secretName: "airbyte-cloudsql-secret"
    host: "10.xx.x.x"  # Cloud SQL private IP
    port: "5432"
    database: "airbyte"
    user: "airbyte"
    passwordSecretKey: "database-password"
Critical for Production:
- External database prevents data loss during pod restarts
- Cloud SQL provides automated backups and high availability
- Private IP ensures secure database connections
Storage Configuration
global:
  storage:
    type: "gcs"
    secretName: "airbyte-gcs-log-creds"
    bucket:
      log: "airbyte-storage-xxxx"
      state: "airbyte-storage-xxxx"
      workloadOutput: "airbyte-storage-xxxx"
    gcs:
      projectId: "prj-xxxx"
      credentialsJsonPath: "/secrets/gcs-log-creds/gcp.json"
Storage Strategy:
- Single bucket with different prefixes for organization
- Service account with minimal required permissions
- Persistent storage for job state and logs
ARM64 Specific Configurations
Every service needs ARM64 tolerations:
global:
  tolerations:
    - key: kubernetes.io/arch
      operator: Equal
      value: arm64
      effect: NoSchedule

# Applied to each service (webapp, server, worker, etc.)
webapp:
  tolerations:
    - key: kubernetes.io/arch
      operator: Equal
      value: arm64
      effect: NoSchedule
High Availability Setup
# Server HA configuration
server:
  replicaCount: 3
  podDisruptionBudget:
    enabled: true
    minAvailable: 2
  affinity:
    podAntiAffinity:
      requiredDuringSchedulingIgnoredDuringExecution:
        - labelSelector:
            matchExpressions:
              - key: app.kubernetes.io/name
                operator: In
                values:
                  - server
          topologyKey: kubernetes.io/hostname
HA Benefits:
- 3 replicas ensure service availability during node failures
- Pod disruption budgets prevent simultaneous pod evictions
- Anti-affinity rules spread pods across different nodes
Resource Optimization for ARM64
global:
  env_vars:
    # Database connection optimization
    HIKARI_MAXIMUM_POOL_SIZE: "40"
    HIKARI_CONNECTION_TIMEOUT: "5000"
    HIKARI_IDLE_TIMEOUT: "300000"

    # JVM optimization for ARM64
    JAVA_OPTS: "-XX:+UseG1GC -XX:MaxGCPauseMillis=200 -XX:+HeapDumpOnOutOfMemoryError -XX:HeapDumpPath=/tmp -Xms2g -Xmx3g -XX:+ExitOnOutOfMemoryError"
Job Resource Configuration
global:
  jobs:
    resources:
      requests:
        memory: 2Gi
        cpu: 500m
      limits:
        memory: 8Gi
        cpu: 4

    kube:
      nodeSelector:
        workload: airbyte-jobs
      tolerations:
        - key: airbyte-jobs
          operator: Equal
          value: "true"
          effect: NoSchedule
Job Optimization:
- Dedicated node pool for data processing jobs
- Resource limits prevent job pods from overwhelming nodes
- Node selectors ensure jobs run on appropriate hardware
Step-by-Step Installation
1. Create Namespace
kubectl create namespace airbyte
2. Create Required Secrets
Database Secret:
kubectl create secret generic airbyte-cloudsql-secret \
  --from-literal=database-password='your-secure-password' \
  -n airbyte
Authentication Secret:
kubectl create secret generic airbyte-auth-secrets \
  --from-literal=instance-admin-password='your-admin-password' \
  -n airbyte
GCS Service Account Secret:
kubectl create secret generic airbyte-gcs-log-creds \
  --from-file=gcp.json=/path/to/service-account-key.json \
  -n airbyte
3. Install Airbyte with Helm
helm install airbyte airbyte/airbyte \
  --version 1.8.1 \
  -n airbyte \
  --create-namespace \
  -f airbyte-k8s/helm/values/values-v1.yaml \
  --timeout 10m \
  --wait
Installation Parameters:
--version 1.8.1: Specific version for stability--create-namespace: Auto-create namespace if it doesn't exist--timeout 10m: Allow sufficient time for ARM64 image pulls--wait: Wait for all resources to be ready
4. Verify Installation
# Check pod status
kubectl get pods -n airbyte

# Check services
kubectl get svc -n airbyte

# Check ingress
kubectl get ingress -n airbyte
Expected pod status (all Running):
NAME                                            READY   STATUS    RESTARTS
airbyte-server-75595f7b5b-4kvbq                 1/1     Running   0
airbyte-server-75595f7b5b-7gd2w                 1/1     Running   0
airbyte-server-75595f7b5b-86x2q                 1/1     Running   0
airbyte-webapp-7547f5b7d8-btbh7                 1/1     Running   0
airbyte-worker-5889c9d94f-mth5q                 1/1     Running   0
airbyte-temporal-75857855b4-2sskj               1/1     Running   0
5. Configure Ingress and SSL
The values file includes ingress configuration:
ingress:
  enabled: true
  className: "nginx"
  annotations:
    cert-manager.io/cluster-issuer: "letsencrypt-prod"
    nginx.ingress.kubernetes.io/force-ssl-redirect: "true"
  hosts:
    - host: etl.yourdomain.com
      paths:
        - path: /
          pathType: Prefix
  tls:
    - secretName: etl-yourdomain-com-tls
      hosts:
        - etl.yourdomain.com
Ensure cert-manager and nginx-ingress are installed:
# Install nginx-ingress if not present
helm repo add ingress-nginx https://kubernetes.github.io/ingress-nginx
helm install nginx-ingress ingress-nginx/ingress-nginx -n ingress-nginx --create-namespace

# Install cert-manager if not present
helm repo add jetstack https://charts.jetstack.io
helm install cert-manager jetstack/cert-manager \
  --namespace cert-manager \
  --create-namespace \
  --version v1.15.3 \
  --set crds.enabled=true
Post-Installation Configuration
1. Access Airbyte UI
Once DNS is configured, access Airbyte at your custom domain:
- URL:
https://etl.yourdomain.com - Username: Your configured email
- Password: From your auth secret
2. Configure Your First Connection
- Add a Source: Choose from 300+ pre-built connectors
- Add a Destination: Configure your data warehouse or lake
- Create Connection: Set up sync schedule and configuration
- Test Sync: Run a test sync to verify everything works
3. Monitoring Setup
Monitor your Airbyte deployment:
# Check resource usage
kubectl top pods -n airbyte

# View logs
kubectl logs -n airbyte -l app.kubernetes.io/name=server --tail=100

# Monitor database connections
kubectl logs -n airbyte -l app.kubernetes.io/name=worker | grep -i connection
Troubleshooting Common Issues
ARM64 Image Pull Issues
If you encounter image pull errors:
# Check node architecture
kubectl get nodes -o wide

# Verify tolerations are applied
kubectl describe pod -n airbyte <pod-name>
Database Connection Issues
# Test database connectivity
kubectl run -it --rm debug --image=postgres:15 --restart=Never -- \
  psql -h <your-db-host> -U airbyte -d airbyte
Storage Access Issues
# Verify GCS permissions
kubectl exec -it -n airbyte <server-pod> -- \
  gsutil ls gs://your-bucket-name
Upgrading Airbyte
Safe Upgrade Process
# Check current version
helm list -n airbyte

# Backup current values
helm get values airbyte -n airbyte > backup-values.yaml

# Upgrade to newer version
helm upgrade airbyte airbyte/airbyte \
  --version 1.8.2 \
  -n airbyte \
  -f airbyte-k8s/helm/values/values-v1.yaml \
  --timeout 10m \
  --wait
Rollback if Needed
# View upgrade history
helm history airbyte -n airbyte

# Rollback to previous version
helm rollback airbyte <revision> -n airbyte
Need Expert Help with Your Airbyte Deployment?
Setting up production-ready Airbyte on ARM64 Kubernetes involves complex configuration management, security considerations, and performance optimization. Don't risk data pipeline downtime with trial-and-error deployments.
EaseCloud's experienced team has deployed Airbyte across diverse enterprise environments with zero-downtime requirements. Our expertise includes:
- ✅ Production Airbyte installations on GKE, EKS, and AKS
- ✅ ARM64 optimization for maximum cost efficiency
- ✅ High availability architecture design and implementation
- ✅ Database performance tuning for high-throughput pipelines
- ✅ Security hardening and compliance configuration
- ✅ 24/7 monitoring and support for mission-critical data operations
Ready to deploy Airbyte the right way from day one? Contact our Kubernetes experts for a consultation on your data platform requirements.
Frequently Asked Questions (FAQs)
1. Why use Helm v1 chart instead of v2 for Airbyte?
Helm Chart v1 (Airbyte 1.8.x) is the stable, production-tested version with comprehensive ARM64 support. V2 charts are newer but may have compatibility issues with ARM64 environments. V1 provides better stability for production deployments while V2 is still maturing.
2. What are the minimum resource requirements for Airbyte on ARM64?
For production deployments, allocate at least:
- GKE Cluster: 4 nodes of t2a-standard-8 (8 vCPUs, 32GB RAM each)
- Database: Cloud SQL db-perf-optimized-N-4 (4 vCPUs, 32GB RAM) minimum
- Storage: 100GB initial allocation with auto-scaling enabled
- Network: Private cluster with 10+ authorized IP ranges
3. How do I configure custom connectors on ARM64 infrastructure?
Custom connectors require ARM64-compatible Docker images. Build your connector images with:
FROM --platform=linux/arm64 airbyte/integration-base:1.8.1
# Your connector code here
Then publish to a registry accessible by your GKE cluster and configure in your values file under the connectors section.
4. Can I use the same Cloud SQL instance for multiple Airbyte deployments?
Yes, but create separate databases within the same instance:
CREATE DATABASE airbyte_prod;
CREATE DATABASE airbyte_staging;
CREATE USER airbyte_prod_user WITH PASSWORD 'secure_password';
GRANT ALL PRIVILEGES ON DATABASE airbyte_prod TO airbyte_prod_user;
Update your values.yaml database configuration accordingly for each deployment.
5. How do I backup and restore Airbyte configuration and metadata?
Airbyte metadata is stored in your Cloud SQL database, which has automated backups. For additional protection:
# Manual database backup
gcloud sql export sql airbyte-postgres gs://your-backup-bucket/airbyte-backup-$(date +%Y%m%d).sql

# Backup Kubernetes secrets and configs
kubectl get secrets -n airbyte -o yaml > airbyte-secrets-backup.yaml
kubectl get configmaps -n airbyte -o yaml > airbyte-configs-backup.yaml