Own Your LLM Stack: On-Premise Deployment
Deploy LLMs on-premises with full data sovereignty, GDPR compliance, sub-20ms latency, and ~30% lower costs using high-performance bare metal inference for European enterprises.
Deploy LLMs on-premises with complete data sovereignty and 30% cost reduction. This guide shows you how to build bare metal inference infrastructure that meets GDPR requirements while delivering sub-20ms latency for European enterprises.
Why European Enterprises Choose Bare Metal
Data sovereignty matters. GDPR penalties reach €20 million or 4% of annual revenue. One cross-border data transfer violation costs more than three years of infrastructure.
European enterprises deploying LLMs on bare metal achieve three strategic advantages:
Complete data control. Your data never leaves your infrastructure. No third-party processors. No cloud provider access. No cross-border transfers. GDPR compliance becomes straightforward.
Predictable costs. Self-hosted Falcon-7B costs approximately $10,300 annually at 70% utilization. Cloud APIs cost $2.50-$60 per million tokens. High-volume workloads favor bare metal economics.
Superior performance. Sub-20ms inference latency. No network round trips to cloud regions. Models run on your local network. Real-time applications become viable.
Environmental benefits matter too. Bare metal deployments reduce energy consumption by 40% compared to equivalent cloud workloads. This supports ESG objectives important to European stakeholders and regulations.
Hardware Selection for LLM Deployment
Choose hardware based on model size and performance requirements.
GPU Workstations for Development
NVIDIA RTX 4090 provides 24GB VRAM. Perfect for models up to 13B parameters with 4-bit quantization. Costs approximately €2,000. Single developer workstation.
RTX 6000 Ada offers 48GB VRAM. Handles 30B parameter models quantized. Enterprise support included. Around €7,000 per card.
For serious development, NVIDIA A6000 delivers 48GB VRAM with ECC memory. Production-grade reliability. Approximately €5,000 per card.
Production Inference Servers
NVIDIA A100 40GB cards run in multi-GPU servers. 4-8 GPUs per server typical. Handles models up to 70B parameters efficiently.
Dell PowerEdge R750xa configuration:

- 2x AMD EPYC 7543 CPUs
- 512GB DDR4 RAM
- 4x NVIDIA A100 40GB GPUs
- 10TB NVMe storage
- Dual 10GbE networking
- Total cost: ~$80,000
NVIDIA H100 80GB represents cutting edge. Single server handles 200B+ parameter models. Expensive but powerful.
Supermicro SYS-421GE-TNRT configuration:
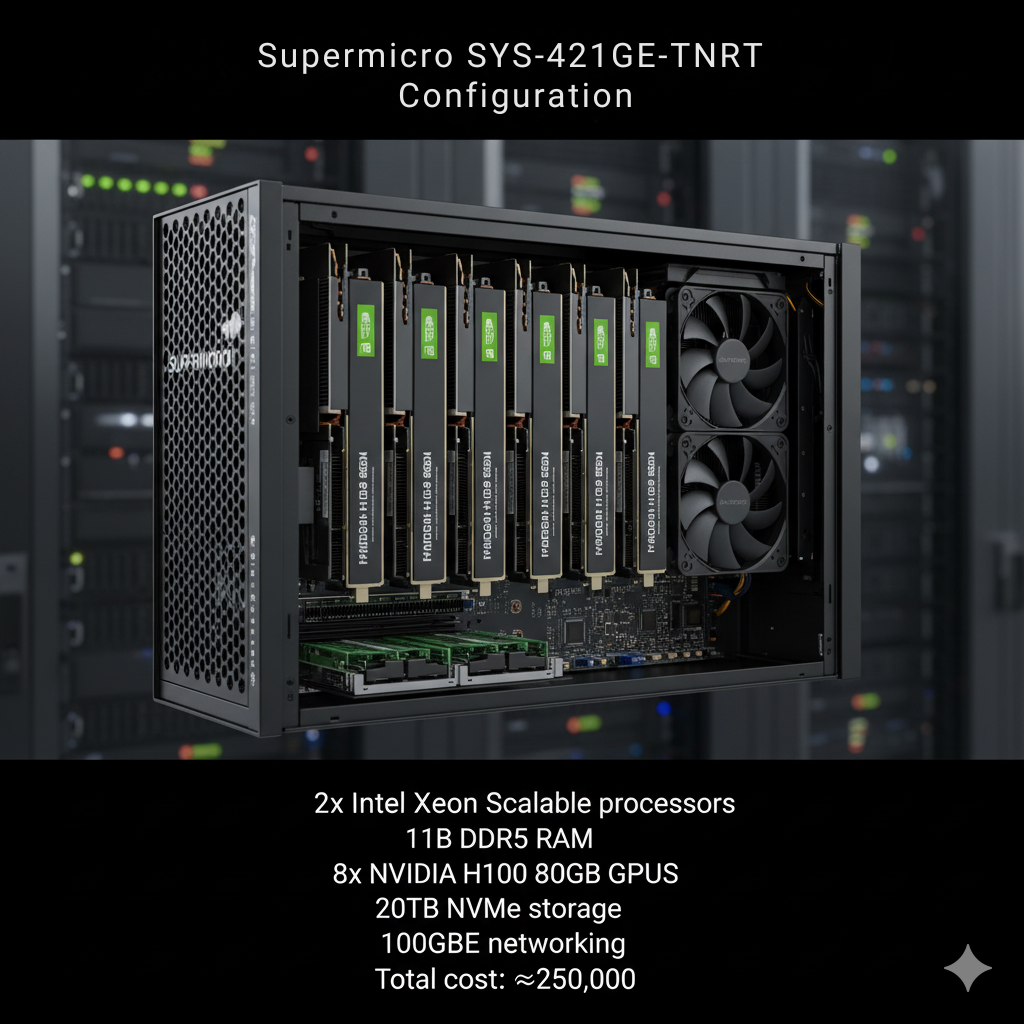
- 2x Intel Xeon Scalable processors
- 1TB DDR5 RAM
- 8x NVIDIA H100 80GB GPUs
- 20TB NVMe storage
- 100GbE networking
- Total cost: ~$250,000
Edge Deployment Hardware
NVIDIA Jetson AGX Orin for edge locations. 64GB RAM. Runs quantized models up to 7B parameters. Costs around €2,000. Low power consumption (15-60W).
Intel NUC with Arc A770 GPU provides 16GB VRAM. Budget edge deployment. Approximately €1,500. Suitable for quantized 3B-7B models.
Consider Raspberry Pi 5 with Hailo-8 AI accelerator for ultra-lightweight deployment. Runs heavily quantized models (3B parameters). Under €200 total cost.
Software Stack for Production
Build reliable inference infrastructure with proven tools.
vLLM for High Performance
vLLM delivers best-in-class performance for production deployments.
PagedAttention memory management reduces memory usage by 50%. More concurrent requests. Better GPU utilization.
Continuous batching processes requests as they arrive. No waiting for batch to fill. Lower latency with high throughput.
Installation:
pip install vllm
# Verify installation
python -c "import vllm; print(vllm.__version__)"
Deploy a model:
# Initialize model
llm = LLM(
model="meta-llama/Llama-2-7b-hf",
tensor_parallel_size=2, # Use 2 GPUs
gpu_memory_utilization=0.9,
max_model_len=4096
)
# Define sampling parameters
sampling_params = SamplingParams(
temperature=0.7,
top_p=0.9,
max_tokens=512
)
# Generate predictions
prompts = ["Explain quantum computing in simple terms."]
outputs = llm.generate(prompts, sampling_params)
for output in outputs:
print(output.outputs[0].text)
Serve with OpenAI-compatible API:
--model meta-llama/Llama-2-13b-hf \
--tensor-parallel-size 4 \
--host 0.0.0.0 \
--port 8000
Ollama for Simplicity
Ollama provides the easiest deployment path. One command starts serving.
Installation:
curl -fsSL https://ollama.ai/install.sh | sh
# Pull and run model
ollama pull llama2:13b
ollama run llama2:13b "What is machine learning?"
Create custom models:
FROM llama2:13b
PARAMETER temperature 0.7
PARAMETER top_p 0.9
SYSTEM You are a helpful AI assistant specialized in European data protection law.Build and run:
ollama run gdpr-assistant
TensorRT-LLM for Maximum Speed
TensorRT-LLM optimizes models specifically for NVIDIA GPUs. 3x throughput improvement typical.
Requires model conversion. More complex setup. Production deployments see dramatic gains.
Quantization for Memory Efficiency
Quantization reduces model size by 50-75% with minimal quality loss.
GGUF Format with llama.cpp
GGUF works excellently for CPU and GPU inference.
Convert model to GGUF:
git clone https://github.com/ggerganov/llama.cpp
cd llama.cpp && make
# Convert model
python convert.py /path/to/llama-2-13b --outtype f16 --outfile llama-2-13b.gguf
# Quantize to 4-bit
./quantize llama-2-13b.gguf llama-2-13b-q4.gguf q4_0
Run inference:
-p "Explain GDPR Article 25" \
-n 512 \
-t 8 # 8 threads
AWQ for GPU Deployment
AWQ (Activation-aware Weight Quantization) maintains accuracy better than GPTQ.
from transformers import AutoTokenizer
model_path = "meta-llama/Llama-2-13b-hf"
quant_path = "llama-2-13b-awq"
# Load model
model = AutoAWQForCausalLM.from_pretrained(model_path)
tokenizer = AutoTokenizer.from_pretrained(model_path)
# Quantize
quant_config = {
"zero_point": True,
"q_group_size": 128,
"w_bit": 4,
"version": "GEMM"
}
model.quantize(tokenizer, quant_config=quant_config)
model.save_quantized(quant_path)
Kubernetes for Production Orchestration
Deploy LLMs on Kubernetes for reliability and scaling.
On-Premises Kubernetes Setup
Install K3s for lightweight Kubernetes:
curl -sfL https://get.k3s.io | sh -
# Get node token
sudo cat /var/lib/rancher/k3s/server/node-token
# Join worker nodes
curl -sfL https://get.k3s.io | K3S_URL=https://master:6443 \
K3S_TOKEN=<node-token> sh -
Configure GPU support:
distribution=$(. /etc/os-release;echo $ID$VERSION_ID)
curl -s -L https://nvidia.github.io/libnvidia-container/gpgkey | sudo apt-key add -
sudo apt-get update && sudo apt-get install -y nvidia-container-toolkit
# Configure containerd
sudo nvidia-ctk runtime configure --runtime=containerd
sudo systemctl restart k3s
Deploy LLM Workload
Create deployment manifest:
kind: Deployment
metadata:
name: llama-inference
spec:
replicas: 2
selector:
matchLabels:
app: llama
template:
metadata:
labels:
app: llama
spec:
containers:
- name: vllm
image: vllm/vllm-openai:latest
command:
- "python"
- "-m"
- "vllm.entrypoints.openai.api_server"
- "--model"
- "meta-llama/Llama-2-13b-hf"
- "--tensor-parallel-size"
- "2"
resources:
limits:
nvidia.com/gpu: 2
memory: "64Gi"
requests:
cpu: "8"
memory: "32Gi"
ports:
- containerPort: 8000
---
apiVersion: v1
kind: Service
metadata:
name: llama-service
spec:
selector:
app: llama
ports:
- port: 80
targetPort: 8000
type: LoadBalancer
Deploy:
kubectl get pods -w # Watch deployment
Monitoring and Observability
Track model performance and resource usage.
Prometheus and Grafana
Deploy monitoring stack:
helm repo add prometheus-community https://prometheus-community.github.io/helm-charts
helm repo update
# Install kube-prometheus-stack
helm install prometheus prometheus-community/kube-prometheus-stack \
--namespace monitoring \
--create-namespace
Create Grafana dashboard tracking:
- Requests per second
- P50, P95, P99 latency
- GPU utilization
- Memory usage
- Model throughput (tokens/second)
NVIDIA DCGM for GPU Monitoring
Install NVIDIA Data Center GPU Manager:
distribution=$(. /etc/os-release;echo $ID$VERSION_ID | sed -e 's/\.//g')
wget https://developer.download.nvidia.com/compute/cuda/repos/$distribution/x86_64/cuda-keyring_1.0-1_all.deb
sudo dpkg -i cuda-keyring_1.0-1_all.deb
sudo apt-get update && sudo apt-get install -y datacenter-gpu-manager
# Start DCGM
sudo systemctl start nvidia-dcgm
sudo systemctl enable nvidia-dcgm
GDPR Compliance Framework
Build compliant LLM infrastructure.
Data Minimization
Collect only necessary data. Log prompts only for debugging. Delete logs after 30 days.
from logging.handlers import TimedRotatingFileHandler
# Configure logging with retention
handler = TimedRotatingFileHandler(
'llm_requests.log',
when='D',
interval=30,
backupCount=0 # Delete after 30 days
)
logging.basicConfig(
handlers=[handler],
level=logging.INFO,
format='%(asctime)s - %(message)s'
)
Data Processing Records
Maintain Article 30 records:
controller:
name: "Your Company Ltd"
contact: "dpo@company.eu"
processing_purpose: "Customer support chatbot assistance"
legal_basis: "Legitimate interest (Article 6(1)(f))"
data_categories:
- "Customer support queries"
- "Chat conversation history"
retention_period: "30 days"
technical_measures:
- "On-premises deployment"
- "Encrypted storage"
- "Access controls"
- "Audit logging"
Access Controls
Implement role-based access:
from flask import request, abort
def require_auth(role):
def decorator(f):
@wraps(f)
def decorated(*args, **kwargs):
token = request.headers.get('Authorization')
user_role = verify_token(token) # Your auth logic
if user_role != role:
abort(403)
return f(*args, **kwargs)
return decorated
return decorator
@app.route('/generate')
@require_auth('ml-engineer')
def generate():
# Only ML engineers can generate
pass
Cost Analysis and ROI
Calculate bare metal economics.
Hardware Costs (Example)
Initial investment:
- 4x NVIDIA A100 40GB server: $80,000
- Networking equipment: $5,000
- Rack and cooling: $3,000
- Total: $88,000
Annual operating costs:
- Power (8kW × $0.12/kWh × 8760h): $8,409
- Cooling (20% of power): $1,682
- Maintenance: $4,000
- Total: $14,091/year
3-year TCO: $130,273 ($43,424/year)
Cloud Comparison
AWS equivalent (4x A100 40GB):
- p4d.24xlarge: $32.77/hour
- Monthly: $23,595
- 3-year: $849,420
Savings: $719,147 over 3 years (84% reduction)
Break-even: ~5.6 months of operation
Getting Started: First Deployment
Deploy your first bare metal LLM in two weeks.
Week 1: Infrastructure Setup
Order hardware. Dell PowerEdge or Supermicro recommended. 4-6 week lead time typical.
While waiting, prepare:
- Network configuration (VLANs, firewalls)
- Storage planning (NVMe for models)
- Backup strategy
- Monitoring tools
Install Ubuntu Server 22.04 LTS. Apply security updates. Configure SSH access.
Week 2: Model Deployment
Install NVIDIA drivers and CUDA:
nvidia-smi # Verify installation
Install vLLM and deploy first model:
python -m vllm.entrypoints.openai.api_server \
--model meta-llama/Llama-2-7b-hf \
--host 0.0.0.0
Test inference:
-H "Content-Type: application/json" \
-d '{
"model": "meta-llama/Llama-2-7b-hf",
"prompt": "Explain GDPR in simple terms.",
"max_tokens": 100
}'
Building Your Bare Metal LLM Infrastructure
Bare metal deployment offers European enterprises complete data sovereignty, predictable costs, and superior performance for LLM workloads. Hardware investments deliver break-even within 3-8 months for high-utilization scenarios while providing full GDPR compliance through on-premises data processing.
Modern software stacks like vLLM, Ollama, and TensorRT-LLM simplify deployment and optimization, often supported by specialized kubernetes consulting services to ensure best-practice architecture and performance tuning. Kubernetes orchestration enables production-grade reliability with automated scaling and health monitoring. Quantization techniques reduce memory requirements by 50–75% without material quality loss.
Choose bare metal when data sovereignty matters, workload volumes justify capital investment, and your team has infrastructure expertise. Start with a single GPU workstation for testing. Scale to production servers with multiple GPUs as requirements grow. Monitor costs and performance continuously to optimize resource allocation.
Frequently Asked Questions
What's the minimum hardware investment for production LLM deployment?
For production workloads serving 7B-13B parameter models, budget €30,000-€50,000 minimum. This buys a server with 2-4 NVIDIA A10 or RTX 6000 Ada GPUs, sufficient RAM (256GB+), and NVMe storage.
For development and testing, €5,000-€10,000 gets a workstation with single RTX 4090 or A6000. Suitable for model testing and low-volume inference.
Enterprise deployments handling 70B+ parameter models require €150,000-€300,000 for servers with 8x A100 or H100 GPUs. Factor in networking, cooling, and redundancy.
How do bare metal costs compare to cloud long-term?
Break-even occurs at 3-8 months depending on utilization. High-utilization scenarios (>60%) favor bare metal heavily.
Example: 4x A100 server costs $80,000 upfront plus $14,000/year operating. Equivalent AWS p4d.24xlarge costs $23,595/month ($283,140/year). Payback in 3.7 months.
Low utilization (<20%) favors cloud. No idle infrastructure costs. Pay only for usage.
Can bare metal infrastructure meet enterprise SLA requirements?
Yes with proper architecture. Achieve 99.9% uptime through:
- Redundant servers (N+1 configuration)
- Load balancing across instances
- Automated health checks and failover
- Spare hardware for quick replacement
- Regular maintenance windows
Many European enterprises run mission-critical systems on-premises with better uptime than cloud services. Control over infrastructure enables proactive maintenance.
How difficult is migration from cloud to bare metal?
Technical migration is straightforward. Models in standard formats (PyTorch, ONNX, GGUF) deploy identically. Application code calling APIs needs only URL changes.
Challenges are operational:
- Building in-house expertise (hire or train)
- Procurement and setup time (2-3 months)
- Initial capital investment
- Monitoring and maintenance processes
Budget 1-2 months for full migration including testing and validation.
What about model updates and experimentation?
Bare metal doesn't limit experimentation. Deploy multiple models concurrently. Switch models quickly by changing configuration.
Use separate GPU allocation for production vs development. Production gets dedicated GPUs. Development shares remaining capacity.
Update production models during maintenance windows. Test thoroughly in staging environment first. Rollback is simple - revert to previous model file.